

My search for a winter project during the autumn of 2002 led me to the designs of Canadian modeller, Ivan Pettigrew. Originally from New Zealand, Ivan has developed a number of large scale, multi-motored models usually using inexpensive ferrites (buggy motors), highly geared and with more cells than you would normally use with this type of motor. The gearing is carefully chosen so that the motors run at maximum efficiency. What this means in practice is that they are running at high RPM's while drawing relatively modest currents. This in turn leads to cool motor running and extended motor life.
One of the first things you notice about his models is the amount of open framework, sheeting only being used where necessary, eg turtle decks and 'D' box sections. Balsa is used extensively, hardwoods being utilised for main spars, motor mounts etc. Other features include own design lightweight retracts manufactured from 10 or 8 swg piano wire (more on this later) and lightweight covering (usually Micafilm). Due to the low currents involved and the use of parallel circuits, battery weights are also kept to a minimum. Not surprisingly, his models usually boast very low wing loading, which in turn leads to more scale-like speeds and longer flight times. This design philosophy appealed very much to me, and I was convinced that this was my way forward. I contacted Ivan by email and soon was receiving all sorts of information, including a very comprehensive and informative list of his models to date. I was also pleased to learn that his plans were available on request.
Which Model to Build
The decision to build the Lancaster came quite easily as it had been near the top of my 'must build some day' list for a long time, so I quickly sent off the requested amount of Canadian dollars, and soon plans for a 1/12 scale Lancaster were winging their way back across the Atlantic to me. Ivan advised me that his Lanc had been built in 1995 and as such, would benefit from several modifications. First of all, the 27-turn buggy motors could be up- graded to Magnetic Mayhems, secondly, for better prop efficiency, the 13 x 8 props (3 bladed) could be replaced by 13 x 10's, and lastly, he felt that his retract mechanism was a bit cumbersome (his first attempt at DIY retracts) and he suggested I had a go at redesigning them.
Making a Start
The retracts were definitely my biggest worry, so I immediately set about the task of drawing up a new layout. This proved to be no mean feat, as although comfortable with geometry and technical drawing, I was totally unfamiliar with the workings of DIY retractable undercarriages. However, after a lot of head scratching, and with Ivan's help, I finally came up with something that seemed to work (at least on paper). With the drawings completed, my next big worry was actually bending the 8 swg (4 mm) wire to its required shape, one of the bends being an incredible 180°, this forming the slot for the actuating crank. I needn't have worried - with Graham Donaldson's workshop to the rescue, a combination of brute strength (not to mention skill) and a heavy duty vice did the trick (see photograph). All bends were done cold.
Purchase of Main Hardware
For some reason, I was unable to purchase 'reverse rotation' Magnetic Mayhems in the UK, so these were purchased along with 'Dave Brown' 5" lightweight wheels (150 grams the pair) from Tower Hobbies. Four Superboxes (5:1) were purchased directly from MEC (saving £60 over UK prices) and finally, six Master Airscrew 13 x 10 wooden propellers (to make up the four 3-bladers) were purchased from John Swain of Fanfare.
Choice of Version
Around three years ago, 'Electric Flight International' had reviewed a 1:12.5 scale Lancaster by John Ranson and Trevor Stannard. This model was based on the B Mk1 'Special', developed in the mid-war years in order to carry Sir Barnes Wallis' 'bouncing bomb' and later on, his 22,000 lb 'grand slam' bomb. The model was all-sheeted, had a wing loading of around 28 oz/ft 2 and used 30 sub-C cells (compare with Ivan's 20 oz/ft 2 and 18 cells). I remembered that along with the plan, a vacuum formed mouldings pack comprising canopy, bomb-aimer's turret, rear turret, spinners and nacelles was also on offer at that time. Now this appealed to me, as besides speeding up construction time, it would be an appropriate model to build in the 60 th anniversary year of the Dambuster's raid. I contacted Traplet to check on the availability and ordered the pack straight away. Ivan's Lanc was to be a B1 'Special'.
Construction
 Except for
the modifications required for the conversion to the B1 'Special' and the fact that I was
building a one-piece fuselage (as opposed to Ivan's two), the fuselage construction was quite
straightforward. The wings required more thought! You'll see from the photographs that the wheel
box is in a most unfortunate position - straight through the wing main-spar! Ivan had explained
previously, he'd had to do this because of the way he had designed the re-tracts, but not to
worry, extra spars fore and aft of the wheel box had been designed to transfer the loads round
the now redundant main spar. Now as an ex-structural engineer, I must admit that the idea of
slicing through a main spar at one of its most critical points didn't fill me with confidence,
and I became doubtful about the whole project. On studying the plans, however, I could see that
the spar which Ivan had placed to the front of the wheel box was a fairly hefty one and ran the
whole length of the main wing. This was reassuring, but in the end, I felt I had to add some
'beefing up' of my own in the area surrounding the wheel boxes. This was achieved by forming an
arrangement of rigid boxes, using extra ribs and sheeting top and bottom, around the area in
question, the theory beingthat bending moments would be transferred around each side of the wheel
box position. I'm confident now that the wings will be strong enough.
Except for
the modifications required for the conversion to the B1 'Special' and the fact that I was
building a one-piece fuselage (as opposed to Ivan's two), the fuselage construction was quite
straightforward. The wings required more thought! You'll see from the photographs that the wheel
box is in a most unfortunate position - straight through the wing main-spar! Ivan had explained
previously, he'd had to do this because of the way he had designed the re-tracts, but not to
worry, extra spars fore and aft of the wheel box had been designed to transfer the loads round
the now redundant main spar. Now as an ex-structural engineer, I must admit that the idea of
slicing through a main spar at one of its most critical points didn't fill me with confidence,
and I became doubtful about the whole project. On studying the plans, however, I could see that
the spar which Ivan had placed to the front of the wheel box was a fairly hefty one and ran the
whole length of the main wing. This was reassuring, but in the end, I felt I had to add some
'beefing up' of my own in the area surrounding the wheel boxes. This was achieved by forming an
arrangement of rigid boxes, using extra ribs and sheeting top and bottom, around the area in
question, the theory beingthat bending moments would be transferred around each side of the wheel
box position. I'm confident now that the wings will be strong enough.
Flaps and Retracts
The flaps shown on the plan, besides involving some intricate construction, looked thin and fragile. Ivan reckoned that, because of the low wing loadings and flying speed of the finished model, the flaps would not be strictly necessary. I took his advice and dispensed with the flaps.
 The
retracts on Ivan's model were operated from a central sailing winch servo via a drum - a rather
clumsy arrangement he now admits himself. In view of the complicated nature of the retract
mechanisms and the potential difficulty in synchronising the two wheels, I opted to go for
separate wing mounted retract servos. These were quite a challenge to install and connect up, but
are now operating satisfactorily.
The
retracts on Ivan's model were operated from a central sailing winch servo via a drum - a rather
clumsy arrangement he now admits himself. In view of the complicated nature of the retract
mechanisms and the potential difficulty in synchronising the two wheels, I opted to go for
separate wing mounted retract servos. These were quite a challenge to install and connect up, but
are now operating satisfactorily.
The Finished Airframe
 The
airframe weight (as shown in the photo) has come out at a very promising 2.2 Kg, giving me an
estimated finished weight of 5.1 Kg. which would correspond to a wing loading of 20 oz/ft 2. This
weight is well below my target weight (makes a change) and gives me scope to consider the use of
Sanyo 'C' cells, which although about 25 grams heavier, would give me slightly longer flight
times. Elevator control is by a Sullivan 'Gold-n-rod' while both tail wheel and rudders are
controlled by closed loops.
The
airframe weight (as shown in the photo) has come out at a very promising 2.2 Kg, giving me an
estimated finished weight of 5.1 Kg. which would correspond to a wing loading of 20 oz/ft 2. This
weight is well below my target weight (makes a change) and gives me scope to consider the use of
Sanyo 'C' cells, which although about 25 grams heavier, would give me slightly longer flight
times. Elevator control is by a Sullivan 'Gold-n-rod' while both tail wheel and rudders are
controlled by closed loops.
The Propellers
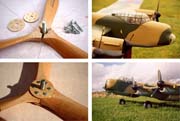 Six no.
'Master Airscrew 13 x 10 woods' were purchased from John Swain (Fanfare), then cut into twelve
individual blades. Be-cause of varying wood densities, the blades were then accurately weighed
and grouped together into four groups of three. This ensured that the final prop assemblies would
require only the minimum of balancing. My first attempt resulted in a highly out-of- balance prop
which required chunks of lead near the hub to balance it - not a pretty sight! The next step was
to construct a jig to facilitate the accurate assembly of the blades. The jig comprised a flat
board with a bolt inserted through a hole in the middle round which the blades would be
assembled, and a sheet on which the 120° lines were drawn. Five minute epoxy was used for initial
assembly. Then one hour epoxy for attaching the 1.5mm ply discs front and back. Holes were then
accurately drilled for the m² nuts and bolts which act as a further restraint to the propeller
flying apart (highly unlikely at the low rpm involved). All my props run very smoothly with not a
hint of a wobble.
Six no.
'Master Airscrew 13 x 10 woods' were purchased from John Swain (Fanfare), then cut into twelve
individual blades. Be-cause of varying wood densities, the blades were then accurately weighed
and grouped together into four groups of three. This ensured that the final prop assemblies would
require only the minimum of balancing. My first attempt resulted in a highly out-of- balance prop
which required chunks of lead near the hub to balance it - not a pretty sight! The next step was
to construct a jig to facilitate the accurate assembly of the blades. The jig comprised a flat
board with a bolt inserted through a hole in the middle round which the blades would be
assembled, and a sheet on which the 120° lines were drawn. Five minute epoxy was used for initial
assembly. Then one hour epoxy for attaching the 1.5mm ply discs front and back. Holes were then
accurately drilled for the m² nuts and bolts which act as a further restraint to the propeller
flying apart (highly unlikely at the low rpm involved). All my props run very smoothly with not a
hint of a wobble.
The Bomb
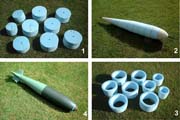 The bomb
was made up using circular sections cut from 50mm thick blue foam. The pieces were then threaded
on to a dowel and sanded to shape. With the dowel removed, each section was then hollowed out
leaving a skin thickness of approximately 8mm. The foam pieces were then glued together, and a
balsa nose added. After final shaping, half- ounce glass cloth was attached, followed by the
application of three or four coats of resin with the appropriate amount of rubbing down between
each coat to leave a smooth paintable finish. The fins, which had been prepared separately, were
then dowelled and glued in place, set at an angle 5° as per full size (this imparted a spin in
the falling bomb). The support ring was inserted at the appropriate place and the bomb balanced
by inserting lead into the balsa nose. The finished bomb weighs 130g and hangs on the centre of
gravity of the model, so that no trim change is necessary after release. After several bomb
drops, it is showing no signs of damage, although I'm told a few holes are appearing in our
flying field!
The bomb
was made up using circular sections cut from 50mm thick blue foam. The pieces were then threaded
on to a dowel and sanded to shape. With the dowel removed, each section was then hollowed out
leaving a skin thickness of approximately 8mm. The foam pieces were then glued together, and a
balsa nose added. After final shaping, half- ounce glass cloth was attached, followed by the
application of three or four coats of resin with the appropriate amount of rubbing down between
each coat to leave a smooth paintable finish. The fins, which had been prepared separately, were
then dowelled and glued in place, set at an angle 5° as per full size (this imparted a spin in
the falling bomb). The support ring was inserted at the appropriate place and the bomb balanced
by inserting lead into the balsa nose. The finished bomb weighs 130g and hangs on the centre of
gravity of the model, so that no trim change is necessary after release. After several bomb
drops, it is showing no signs of damage, although I'm told a few holes are appearing in our
flying field!
Preparation
After a final sanding, the entire framework was given a coat of 'Balsarite', an almost weightless treatment which not only conditions the balsa, but also improves the adhesion of the covering (available from Mike Woodhouse of Free Flight Supplies). My choice of covering was transparent 'Prolite'. This was chosen in preference to solarfilm on the belief that it was the lighter of the two materials. In fact, according to my calculations, it's about the same weight. I had considered Sig Koverall, but came to the conclusion that the process of filling the weave with dope in preparation for the painting was not only time consuming but would add a lot of extra weight to the model. On completion of the covering, my yellow 'see-through' Lancaster was now given a coat of 'Prymol' to prepare the surface for painting.
Covering and Painting
 As the
colour scheme was taken from the 1:72 'Airfix' version, the task of finding the correct colours
and markings was made easy. The scheme is the 'daylight scheme' used by No.15 Squadron when it
was involved in trials conducted against the reinforced German U- boat pens at Brest just after
the war. Humbrol 86 (matt light olive) and Humbrol 93 (matt desert yellow) were used on the upper
surfaces, while Humbrol 165 (satin medium sea grey) was used on the under-surfaces. My mini spray
gun was used throughout to apply the paint. It was found that a primer coat was not necessary,
and that two coats of each colour were sufficient to give a good coverage. A final two coats of
satin varnish brought the colours to life. The covering added 179 grams to the weight of the
model, the paint and varnish adding another 136g. This works out at 57g/m² for the covering and
43g/m²for the paint and varnish, giving a total of 100g/m² (or 3.1 oz/ft² - about the same as
that for coloured Solartex.
As the
colour scheme was taken from the 1:72 'Airfix' version, the task of finding the correct colours
and markings was made easy. The scheme is the 'daylight scheme' used by No.15 Squadron when it
was involved in trials conducted against the reinforced German U- boat pens at Brest just after
the war. Humbrol 86 (matt light olive) and Humbrol 93 (matt desert yellow) were used on the upper
surfaces, while Humbrol 165 (satin medium sea grey) was used on the under-surfaces. My mini spray
gun was used throughout to apply the paint. It was found that a primer coat was not necessary,
and that two coats of each colour were sufficient to give a good coverage. A final two coats of
satin varnish brought the colours to life. The covering added 179 grams to the weight of the
model, the paint and varnish adding another 136g. This works out at 57g/m² for the covering and
43g/m²for the paint and varnish, giving a total of 100g/m² (or 3.1 oz/ft² - about the same as
that for coloured Solartex.
Flying
The first thing I discovered about this model is that there is power in abundance. Take off into a reasonable breeze, and it's off the ground before you know it! So for realism, take-offs are best done at part throttle. Flying it is a dream and although only nine flights under my belt, no vices have come to light. A little rudder coupled with the ailerons helps with the turns. It cruises around happily at about 50% throttle and at full throttle, climbs quite rapidly. The bomb drop is spectacular too.
 Having
said that, it's not all good news. My first two landings resulted in collapsed retracts and,
unfortunately, broken propellers! My weight saving efforts had been a little over- enthusiastic.
A weakness in the retract support work (my design, not Ivan's) proved to be the problem. So
strengthening work involving more spruce strip and 1.5mm ply was carried out in this area. Also,
due to the mounting tally of broken propellers, I opted to fit 2- bladed props in place of the
three-bladed ones until I got the hang of things. The 14 x 10 APC-E' two-bladed replacement props
proved to be very efficient with no noticeable difference in performance (with the possible
exception of rate of climb) and a distinct reduction in battery duration.
Having
said that, it's not all good news. My first two landings resulted in collapsed retracts and,
unfortunately, broken propellers! My weight saving efforts had been a little over- enthusiastic.
A weakness in the retract support work (my design, not Ivan's) proved to be the problem. So
strengthening work involving more spruce strip and 1.5mm ply was carried out in this area. Also,
due to the mounting tally of broken propellers, I opted to fit 2- bladed props in place of the
three-bladed ones until I got the hang of things. The 14 x 10 APC-E' two-bladed replacement props
proved to be very efficient with no noticeable difference in performance (with the possible
exception of rate of climb) and a distinct reduction in battery duration.
Now, with the retract problems hopefully sorted out and my landing technique slightly improved, I'm back with the three bladders and looks nicer too! A weakness does however, remain in the wire legs, which tend to bend back quite easily if there is any suggestion of a bumpy landing - all the more reason to perfect my landings. As the ailerons are set up as flaperons, there yet remains the possibility of using some flap effect on the landings, but as the landing speeds are in any case very low, there is no immediate urgency to try this, but in an effort to avoid further bumpy landings, some experimenting might be in order.
Conclusion
 To sum up, this
is an impressive model with tremendous presence in the air and which has very pleasing flying
characteristics. The vulnerability of the retracts remains a problem, but with the weight not an
issue, I'm sure consideration could be given to the fitting of commercial retracts. I am looking
forward to many more happy flights with this brilliant model.
To sum up, this
is an impressive model with tremendous presence in the air and which has very pleasing flying
characteristics. The vulnerability of the retracts remains a problem, but with the weight not an
issue, I'm sure consideration could be given to the fitting of commercial retracts. I am looking
forward to many more happy flights with this brilliant model.