
 Well blow me down,
where has the year gone? End of July and the Nats heaving into sight, what to fly? I decided
this year to fly in the 2 meter electric soaring event so what to fly? My current two meter
has (had) a one piece wing and I am sure Alistair or Norrie don't fancy driving from Aberdeen
to Grantham with a wing tip in the back of their neck. I retrieved my Lanier plan and started
a 2 piece wing but thought it would be less work to go for an ARTF model, scanned the mags
and www and settled on the Kunlun. This is a 2 meter sailplane for rudder, elevator, aileron
& motor, although the instructions say to glue the wings together I will keep them
separate but tape them when I assemble the model. As usual opening the box revealed very few
components, a stunning glass fuz, a pair of ready covered wings, a tailplane and a bag of
bits. First thoughts, what to change? I thought I would make the tailplane detachable for
travelling. Themodel comes with a superstructure ready bonded inside the fuz, this is for
installation of the servo's and battery mount. Really well done.
Well blow me down,
where has the year gone? End of July and the Nats heaving into sight, what to fly? I decided
this year to fly in the 2 meter electric soaring event so what to fly? My current two meter
has (had) a one piece wing and I am sure Alistair or Norrie don't fancy driving from Aberdeen
to Grantham with a wing tip in the back of their neck. I retrieved my Lanier plan and started
a 2 piece wing but thought it would be less work to go for an ARTF model, scanned the mags
and www and settled on the Kunlun. This is a 2 meter sailplane for rudder, elevator, aileron
& motor, although the instructions say to glue the wings together I will keep them
separate but tape them when I assemble the model. As usual opening the box revealed very few
components, a stunning glass fuz, a pair of ready covered wings, a tailplane and a bag of
bits. First thoughts, what to change? I thought I would make the tailplane detachable for
travelling. Themodel comes with a superstructure ready bonded inside the fuz, this is for
installation of the servo's and battery mount. Really well done.
 So first job, attach the rudder, this is a pre-finished piece
designed to be hinged with tape; no probs, but look at the outlet for the closed loop wire,
very strange but it works. The elevator is operated by a hollow glass fibre rod that needs to
be cut to length, a couple of adaptors inserted and appropriate terminations applied. To make
the tailplane detachable I drilled a pilot hole through the fuz and tailplane seat then used
an M3 Tee nut let into the top of the tailplane, I then opened up the bottom hole to clear
the head of an M3 button screw to secure the tailplane to the seat.
So first job, attach the rudder, this is a pre-finished piece
designed to be hinged with tape; no probs, but look at the outlet for the closed loop wire,
very strange but it works. The elevator is operated by a hollow glass fibre rod that needs to
be cut to length, a couple of adaptors inserted and appropriate terminations applied. To make
the tailplane detachable I drilled a pilot hole through the fuz and tailplane seat then used
an M3 Tee nut let into the top of the tailplane, I then opened up the bottom hole to clear
the head of an M3 button screw to secure the tailplane to the seat.
 Next job the wing servo's: I used
SD150's for this task, these just about fitted into the servo bay, the servo's are stuck to
the servo covers with double sided tape, I toyed with replacing the ply covers with plastic
covers with moulded fairings. I kept with the original covers and may change them once I see
it flying. One thing I did modify was the servo cover fixing which is screwed directly to the
balsa wing skin - bad idea, I cut some M2 ply triangles and glued them to the inside of the
corner of the servo bays to take the screws. I made up some servo extension leads and set up
the ailerons using a servo tester.
Next job the wing servo's: I used
SD150's for this task, these just about fitted into the servo bay, the servo's are stuck to
the servo covers with double sided tape, I toyed with replacing the ply covers with plastic
covers with moulded fairings. I kept with the original covers and may change them once I see
it flying. One thing I did modify was the servo cover fixing which is screwed directly to the
balsa wing skin - bad idea, I cut some M2 ply triangles and glued them to the inside of the
corner of the servo bays to take the screws. I made up some servo extension leads and set up
the ailerons using a servo tester.
 Looking at the drive train I
settled on a Hyperion Z3013-10 brushless motor, an Overlander 40A ESC and a 3 x 2400 Saphion
battery pack, I have given up on LiPo's as I have had no luck with them despite treating them
with kid gloves. This drive train gives me upward of 400 watts which should give me the
desired performance. I mounted the motor using the very substantial aluminium disc onto the
fire wall, used a small cable tie to retain the motor cables and Velcro to retain the
ESC.
Looking at the drive train I
settled on a Hyperion Z3013-10 brushless motor, an Overlander 40A ESC and a 3 x 2400 Saphion
battery pack, I have given up on LiPo's as I have had no luck with them despite treating them
with kid gloves. This drive train gives me upward of 400 watts which should give me the
desired performance. I mounted the motor using the very substantial aluminium disc onto the
fire wall, used a small cable tie to retain the motor cables and Velcro to retain the
ESC.
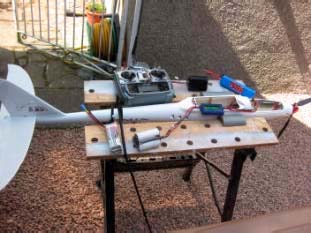 Before flying I set
up everything on the bench to test its performance, I had about 400 watts to play with -
plenty for me.
Before flying I set
up everything on the bench to test its performance, I had about 400 watts to play with -
plenty for me.
I did a quick assembly using all the parts to see how the model would balance, the instructions say 55mm which I think is way too far forward, putting the numbers into MAC it should be 75mm, which to me seemed about right, without adding any weight I got mine to 70mm which will do for test flying. Reading some online forums 70 - 80mm seems to be the desired location.

Off to Kerloch for the test flying, unfortunately the wind was gusting a bit too much for a test flight, however the next day at the rescheduled BBQ the weather was more accommodating. Pre flight checks carried out, all controls moving in the right direction, wings screwed on tight, bicycle clips adjusted, no more reason to delay. Venturing to the quiet end of the field I gave the motor full thrust and away it went and just about taking my fingertips off! The model stood on its tail and rocketed sky wards, some small aileron trim adjustment fed in and at a great height in no time at all I cut the motor and levelled out. A fair bit of up trim was required for straight and level. This was initially hard to judge as the model does not do slow but grooves around the sky going where you point it. Once I got the beast sorted some nice flying ensued. For me the best thing is that it doesn't dig its nose in during a turn, once the bank angle was established the plane could be left to its own devices even for multiple turns. I found the model to be responsive without being twitchy, it also seemed quite sensitive to detecting thermals. Once I ran the battery down it was time for a landing, this was a bit hot but I prefer this as you retain control authority down to the ground. Once I got the model back home I adjusted the control rods and re-zeroed the trims, looking forward to the next session, now in full training for the Nats.
