
 Mention the
word "Chipmunks" to any male of my generation and it's likely that two things will spring
immediately to mind. Alvin and his bloody annoying musical friends and a certain RAF aeroplane if
I'm not mistaken? Well I'm delighted to say that Alvin and the Chipmunks` songs played on the
radio contributed in no small way to my getting out of the house, joining the Air Training Corps
and discovering the latter.What's all this got to do with aeromodelling? Here we go then! Apart
from the early experiences with control-line models I've never possessed a model aeroplane that
could actually ROG, and only recently felt the need to build something a little bigger, that had
the capability to take off and land if the pilot was sober enough. As it happened, one of John
Barnes's bi-annual modelling clearance sales was taking place and on the list of goodies up for
grabs was a Carl Goldberg Super Chipmunk kit. I have to admit that tears clouded my good eye at
the mere mention of the name, bringing back as it did so many fond memories of those years with
the 102 Dyce Squadron ATC. Notably performing aerobatics over the Aberdeen seafront in one of
three "Chippies" flown up from Turnhouse. Sigh! ........ this of course was way, waay, waaay back
in 1964!
Yes, I was vaguely aware that the "Super" Chipmunk was an aerobatic version of the RAF trainer I'd spent countless happy hours in ....... merely a single-seater variant with a bubble canopy, or so I thought. Naw, not quite! The "Super" had essentially the same wing plan form but with enlarged control surfaces, a different shaped cowling to accommodate the bigger more powerful Lycoming engine, spatted wheels, and a whole new tail assembly. Err ...... em ...... basically an entirely new aeroplane then, which hopefully explains the title of this story! However, back to Barnsie's sale. The photo on the boxed kit proved irresistible and I had to have it, even if it meant converting it from IC to electric power. Nostalgia and half a bottle of Merlot the previous evening have a lot to answer for!
Well, 2 years passed before I found the time and inclination to finally get the project under way. First the impressive bit. The Carl Goldberg company had thought of everything and the kit featured all the wood necessary, much of it die-cut, a comprehensive hardware pack, a photo illustrated instruction manual and full-size plans for the model. They even provided jigs for building the symmetrical section wings and neat little gizmos for sanding the LE and control surface profiles. Also good news from my point of view as far as the leccy conversion was concerned, the wings were open structure with balsa D-boxes and the ply fuz sides were mostly holes! So, not much for me to do in the way of lightening the airframe. Brill
Rather disappointingly though (this is the not so impressive bit by the way) some of the wood selected left a lot to be desired, particularly the D-box sheeting which varied so much in density I replaced the lot, and also much of the die-cutting was of poor quality having crushed and split the wood on the rear side of the sheet. The tedious job of going over the die-cuts with a scalpel and finishing with a light sanding was the only way to get a reasonable edge on these components. Even so, the resulting "torn edged" appearance of many of the parts meant I had to use epoxy instead of the recommended cyano to ensure a secure bond. I see from the Goldberg website that this kit is still currently available and now features laser cutting throughout, so the above problem should have been cured.
 Early on in
the proceedings Mike Pirie ran some figures through "Moto-calc" for me and it became obvious that
there were several brushless outrunner motors available that could handle the job, but that
running it on Nimh battery packs wasn't really a viable option, unless I was prepared to hire a
crane to lift the model from the car onto to the flying field. At this point I contacted John
Emms at Puffin Models, gave him the specs for the Chipmunk and he recommended a big Mega motor, a
70amp ESC and 6s 3700mah Lipos. Gulp! ....... this was going to be expensive! Feeling brave I
decided to go for the motor / ESC combo right away, but knew I'd have to pull out all the stops
before the wife would agree to shelling out for the Lipos. When it comes to grovelling lads,
never buy flowers! It's almost like advertising that you're in deep trouble ......... perhaps a
few "plastic surgery vouchers" might be a better way to soften her up? Something for me to
cogitate over in the coming months, so I did what most normal, well balanced, henpecked husbands
would do in this situation and put it off for another day!
 The airframe
took shape pretty quickly and the whole thing was put together as per plan, apart from
substituting the antiquated pushrod and bellcrank operated ailerons with a separate servo for
each and the fitting of optional flaps. Once the fuz structure was complete, I installed the
motor and ESC, fitted the completed wing and tailplane assemblies so that I could work out
battery tray, rudder and elevator servo locations for minimum disturbance to the CG. I was
pleasantly surprised to find that everything was hunky dory when both servos were fitted at the
back end and the batteries placed under the canopy hatch, just ahead of the CG. Lovely
jubbly!
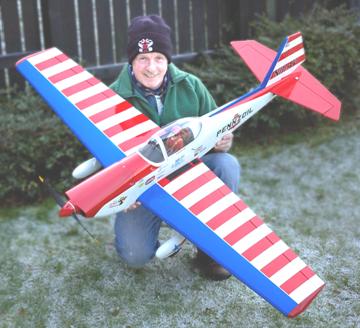
The ABS engine cowl and wheel spats were spray painted with all the wooden parts being covered in a combination Solarspan, Solarfim and Solartrim. There are a variety of colour schemes available to choose from, but I took the easy option and went for the aircraft flown by the late Art Scholl. All the sponsor names and logos were on self-adhesive film provided with the kit, as was the instrument panel, but I had to find a suitable pilot to finish off an otherwise cavernous cockpit. A 1/6th scale latex sport pilot from J Perkins was fitted which weighs almost nothing, is incredibly detailed and paints easily.
Specification
Wingspan - 64"
AUW - 8lbs
Motor - Mega 41/30/15 brushless outrunner
ESC - Jeti 70 Opto
Battery - 2 x 3s 4800mah Lipos in series
Propeller - 14" x 10" APC electric
As it happens, the cost of the Lipo batteries didn't break the bank. By the time I'd finished the model, fellow club member Clinton Reid was keen to get rid of the above packs, along with a charger, for much the same kind of dosh my wife would spent on a one off beauty treatment. As these 'treatments' result in only a very temporary improvement, it appeared to me that the batteries were a much better investment so I bought 'em!
Does it fly? Haven't a clue yet, but it probably should! I must confess to being a little concerned when I discovered my "Chipper's" final flying weight, but it's not excessive when compared to other similar IC to electric conversions. Indeed, the Autumn 2008 RCM&E features a free plan for a 62" span Hurricane (Tony Nijhuis), using either power system and weighing at 8.5 lbs ....... an encouraging sign then! So, excuses for avoiding the maiden flight so far? Poor weather, waiting for a new Tx & recent unforeseen marital problems!